 TheGraph
Basic Network Indexer Installation Guide from Scratch
Pre-requisites
1. Dedicated server (16 Core, RAM 128Gb, 2Tb nvme)
2. Domain like https://web3validator.info/
3. 100,000 GRT for indexing
4. A 12-word mnemonic phrase in order for it to work
Stake on the Network
In order to become an indexer on the Graph Protocol Network, you’ll have to stake a minimum of 100,000 GRT.
This can easily be done via the Web UI, by going to the Graph Explorer.
Login with Metamask on the Wallet that holds your GRT
Go to your Profile, then switch to the “Indexing” Tab and hit “Stake”
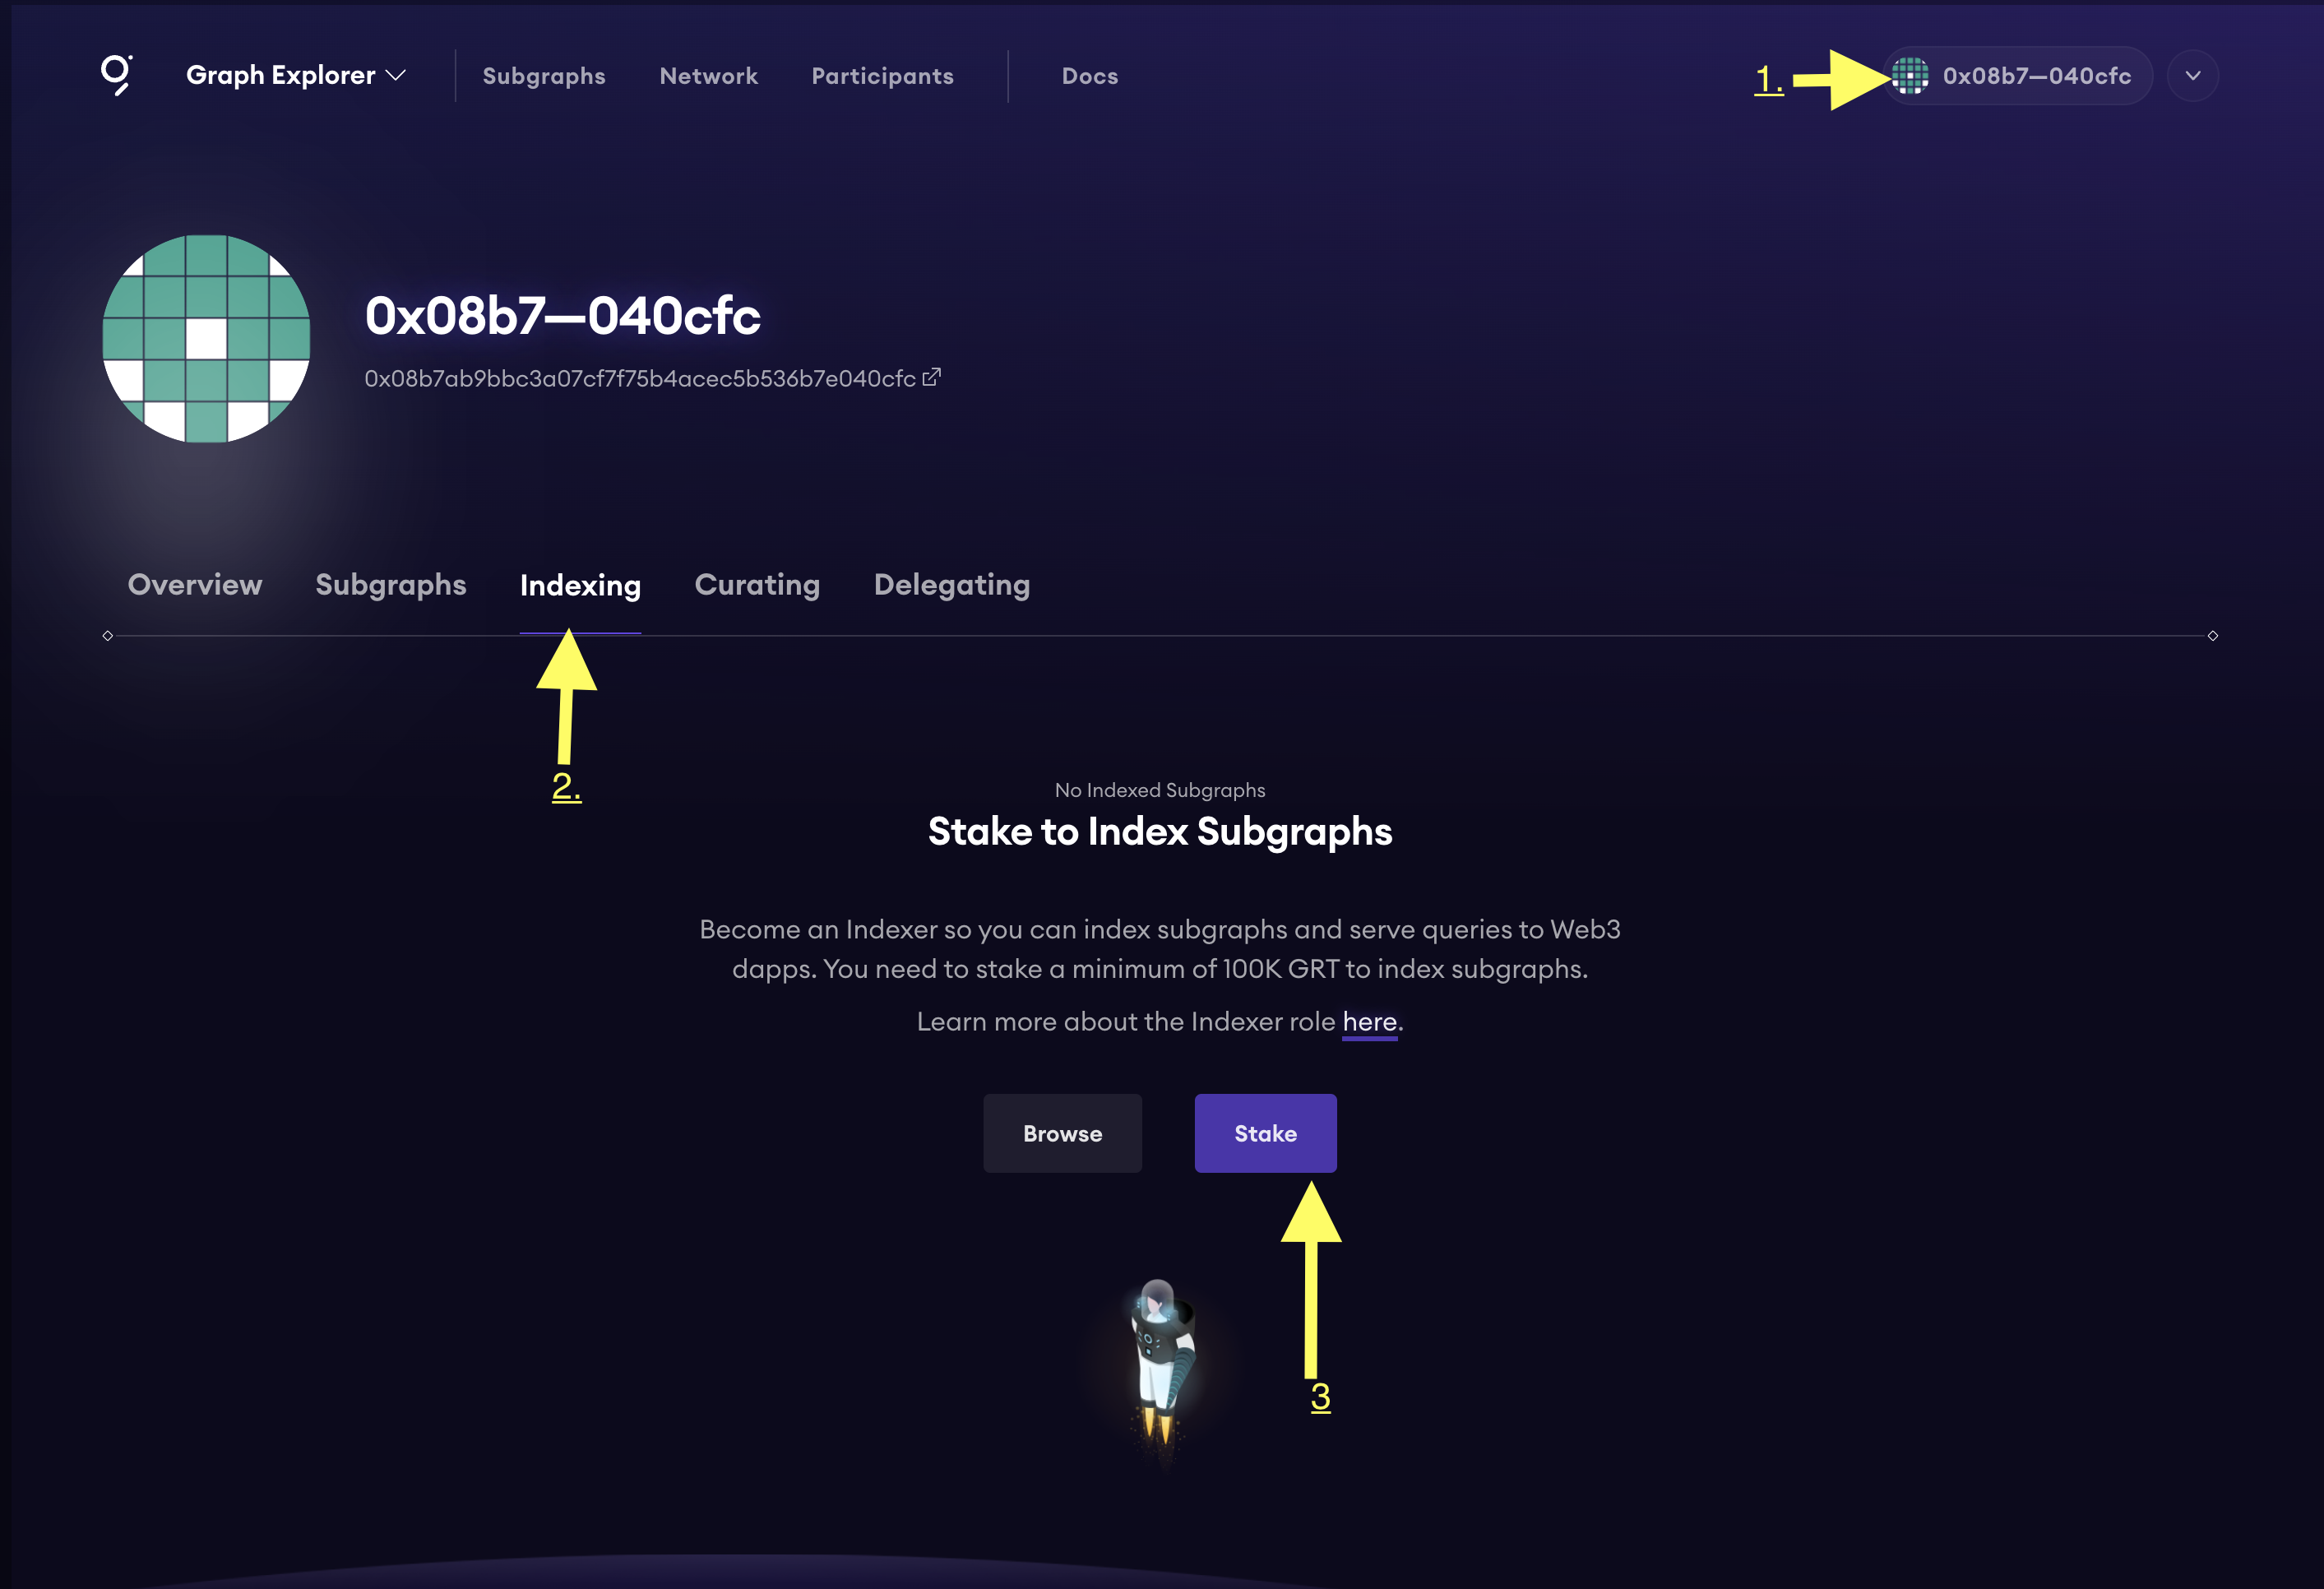
- Stake the amount of GRT that you desire, then you’re all done!
Set your Operator
The Operator is a wallet address that is entirely separate from the address which you staked your GRT from. This Operator wallet will be filled with ETH, and will be used to send transactions (such as allocations) to the network, while keeping your Staked GRT safe in case of an attack on your infrastructure. It is highly recommended for you to use a new wallet, generated from a new mnemonic phrase.
For this, follow the instructions here first, then head back for the rest.
Okay, assuming that you followed the instructions and you have your new Operator wallet at hand, lets go and link it up with the wallet that you used to stake your GRT.
Login with Metamask on the wallet that you used to stake your GRT 4. Click the Profile dropdown button 5. Go to “Settings”, and then to the “Operators” tab

- Click the Plus (+) button and add your operator public address there
- Submit the transaction, then you’re done.
Getting started
Run the following commands to clone the GraphProtocol’s repository
git clone https://github.com/web3validator/graphprotocol-mainnet-docker.git
cd graphprotocol-mainnet-docker
nano .env
Then you need to edit the file called .env and add your values to the following envs:
EMAIL=email@sld.tld
INDEX_HOST=index.sld.tld
GRAFANA_HOST=grafana.sld.tld
AGENT_GUI_HOST=agent.sld.tld
ADMIN_USER=your_user
ADMIN_PASSWORD=your_password
DB_USER=your_db_user
DB_PASS=your_db_password
GRAPH_NODE_DB_NAME=your_graphnode_db_name
AGENT_DB_NAME=your_agent_db_name
CHAIN_0_NAME="network-name"
CHAIN_0_RPC="http://ip:port"
TXN_RPC="http://ip:port"
OPERATOR_SEED_PHRASE="12 or 15 word mnemonic"
STAKING_WALLET_ADDRESS=0xAdDreSs
GEO_COORDINATES='69.420 69.420'
INDEXER_AGENT_OFFCHAIN_SUBGRAPHS=""


#Optional env vars depending on which services you use:

###Indexer agent GUI:
#AGENT_GUI_HOST=agent.sld.tld
#NEXTAUTH_SECRET=$(openssl rand -base64 32)
It should looks like :

**Required env vars:**
- EMAIL - only used as contact to create SSL certificates. Usually it doesn't receive any emails but is required by the certificate issuer.
- INDEX_HOST - your indexer public endpoint. The gateway will be sending queries to this endpoint.
- GRAFANA_HOST - your Grafana dashboard for indexer stack monitoring.
- ADMIN_USER and ADMIN_PASSWORD - will be used by Grafana, Prometheus and AlertManager.
- DB_USER  and DB_PASS - will be used for initializing the PostgreSQL Databases (both index/query DB and indexer agent/service DB).
- GRAPH_NODE_DB_NAME - the name of the database used by the Index/Query nodes.
- AGENT_DB_NAME - the name of the database used by the Indexer agent/service nodes.
- CHAIN_0_NAME - the name of the network that you want to index
- CHAIN_0_RPC - your RPCs (archive nodes) used by the index nodes.
- TXN_RPC - your Goerli ETH RPC used by Indexer agent/service nodes. This can be a fast/full/archive node, up to you! Please note that using Erigon as the TXN_RPC has proven unreliable by some indexers.
- OPERATOR_SEED_PHRASE - the 12/15 word mnemonic that you generated earlier. Will be used by the Agent/Service to send transactions (open/close allocations, etc)
- STAKING_WALLET_ADDRESS - the address (0x...) that you staked your GRT with, ideally living on an entirely different mnemonic phrase than your Operator Wallet.
- GEO_COORDINATES of your server - you can search for an ip location website and check your server exact coordinates.

**Optional env vars:**
- AGENT_GUI_HOST - your Agent GUI endpoint for controlling the Agent and allocations remotely
- NEXTAUTH_SECRET - used by the Agent GUI to salt your password
Note: If you want to use any of the optional env vars, you need to copy the line that you want to enable above the last line, and uncomment it.
Start
Start by picking up the right stack that you want to spin up.
There are several start files used to spin up different components.
I would recommend to start with:
bash start-essentialBe aware that initially it takes several minutes to download and run all the containers (especially the cli container, that one takes a while to build), so be patient. 🙂
Subsequent restarts will be much faster.
In case something goes wrong, find the problem, edit the variables, and add --force-recreate at the end of the command, plus the container you want to recreate:
bash start-essential --force-recreateStart file variants:
start-essential – starts up the graphnode, indexer and monitoring stack – all you need to get up and running on the network
start-optional – starts up the optional stack (for components, read above)
start-autoagora – starts up the autoagora stack (for components, read above)
start-all – starts up the entire stack
Verify that it runs properly
To verify that everything is up and running, you need to:
docker psAnd look for containers that are crash looping – you will notice restarting and a countdown – that means those containers are not working properly.
To further debug, try looking for the container logs and see what they say. More information in the troubleshooting section.
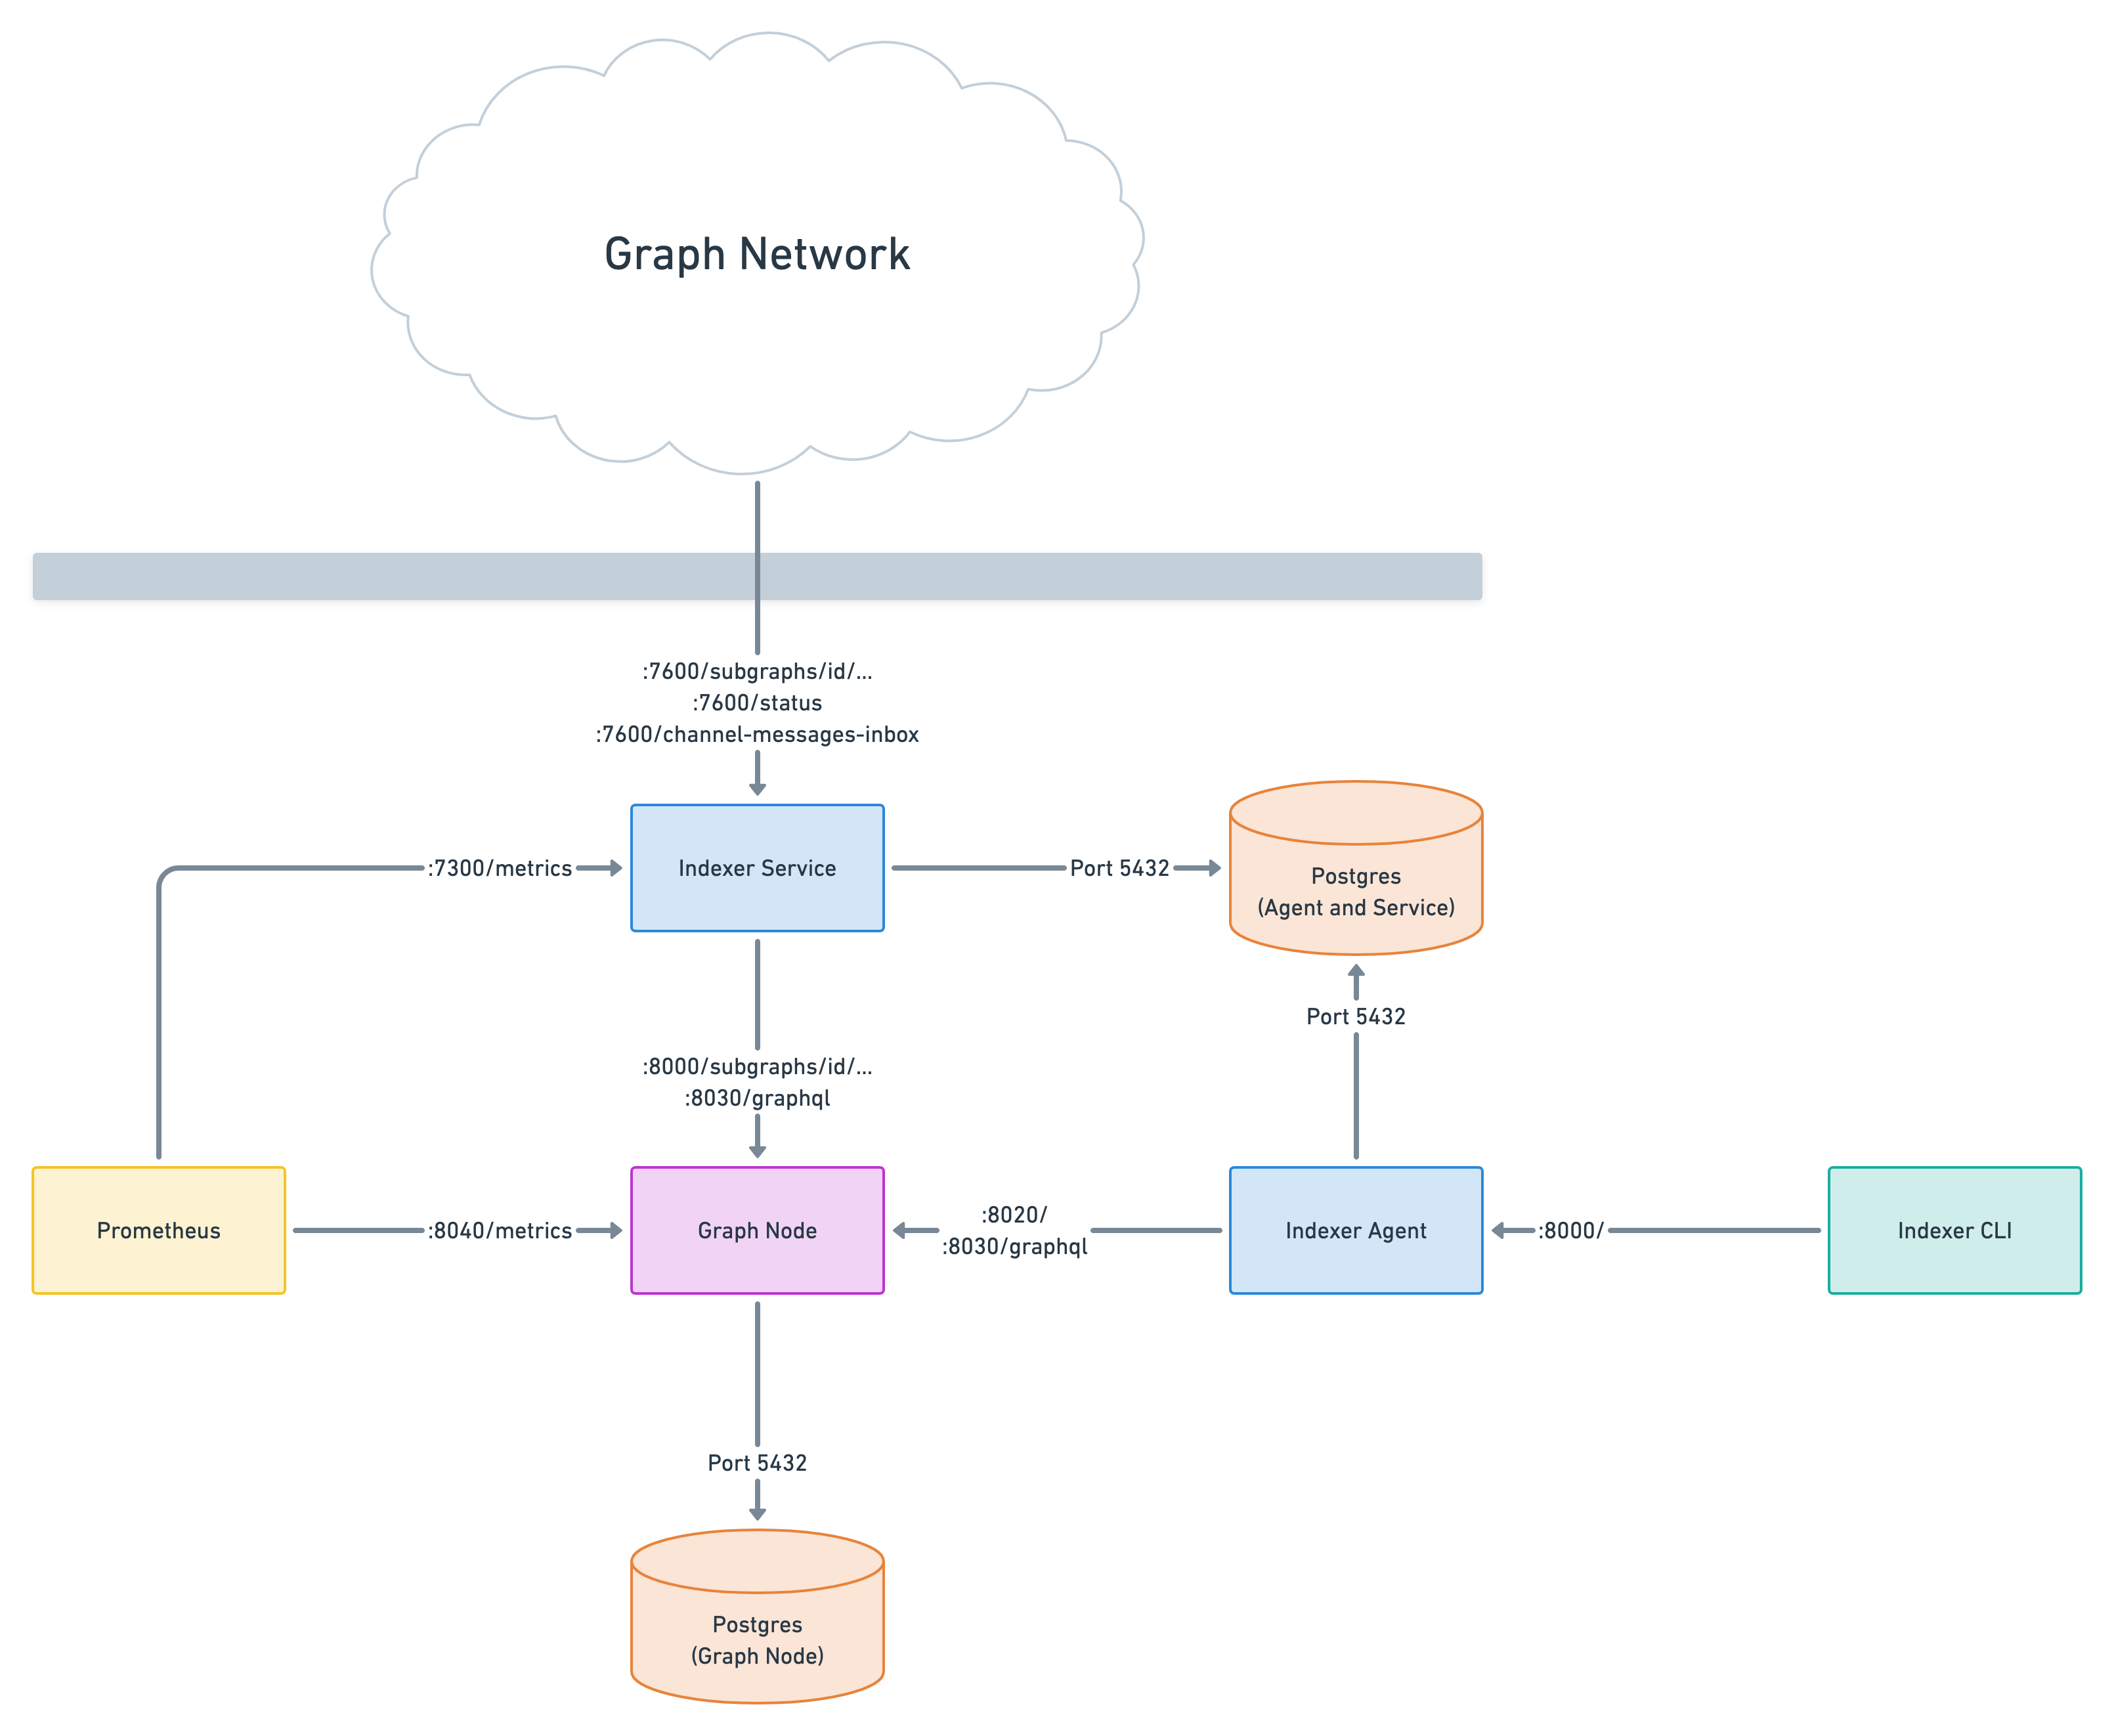
Indexer Infrastructure Ports
Ports Overview
The following ports are being used by all components by default. Also listed are the CLI flags and environment variables that can be used to change the ports.
Graphical Overview
How to access and works with client
Get into the cli container by running the following command inside the root of the repository
./shell cliNow we have access to both graph-cli and the indexer-cli as an extension to the former.
To get more information about the available graph commands use the following:
graph indexer --help
Understanding Subgraph Allocations
In order to get a better understanding around Subgraph Allocations as an indexer, I would highly recommend reading the following article, written by Jim from WaveFive, along with the Network Overview blogposts written by Brandon.
- https://wavefive.notion.site/The-Graph-Protocol-Indexer-Subgraph-Selection-Guide-725f6e575f6e4024ad7e50f2f4e9bbad
- https://thegraph.com/blog/the-graph-network-in-depth-part-1
- https://thegraph.com/blog/the-graph-network-in-depth-part-2
Without a thorough understanding of the Protocol economics, you won’t be profitable. So before jumping to anything else, give those links a read.
Opening Allocations
Once you read those links above and you know exactly what your plan is, and what you’re doing, then make it to the Graph Explorer Testnet (https://testnet.thegraph.com), find the subgraphs that you want to allocate towards, and copy their IPFS hash (Deployment ID).

Now, to allocate towards your chosen subgraph, inside the cli container, run the following command:
graph indexer rules set <IPFS_HASH> allocationAmount <GRT> decisionBasis always
This will trigger the indexer-agent to send an allocation transaction on the network, and once that’s confirmed, you’ve successfully allocated to the subgraph of your choice!
Reviewing your allocations using the indexer-cli
Review local database of allocations
We can use the following command with the indexer-cli:
graph indexer rules get allThis will give us a table with all the allocations that we’ve set up. It doesn’t check for on-chain allocations, as it’s only displaying the allocation rules found in your agent database.
Check for onchain allocations via the indexer-cli
We can use the following command with the indexer-cli:
graph indexer statusThis will give you information about the status of your endpoints, and also display current on-chain allocations and their status.


